Step-by-Step Instructions: Mapping a Network Drive on Windows 8
If you’ve never mapped a network drive, it sounds like a daunting, “techie” task that may have you running for the nearest Bat Phone to IT. But creating a webfolder or letter drive just takes a few steps and gives you access to your remote files on your local machine. Once connected to your WebDav WebFolder, you can copy and paste, drag and drop, rename, move, and generally work with your files as if they were on your local PC.
Let’s Get Started:
Mapping a Letter Drive
1. Click the Start button in the bottom left-hand corner of your screen.

2. Select Computer from the interface.

3. Choose “Map Network Drive” from the quick menu at the bottom of the screen.

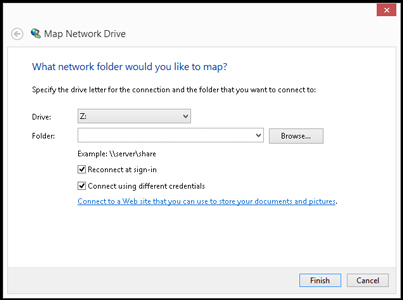
4. Select the letter you wish to assign to your drive from the dropdown menu.
5. In the address field, enter https://mnd101.mynetdrives.com:$PORT, where “$PORT” is your WebDav login Port, enable both “Reconnect at sign-in” and “Connect using different credentials”, then click Finish.
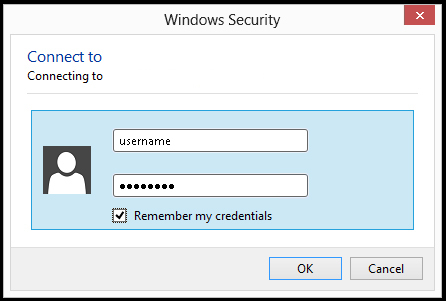
6. When prompted, enter your WebDav username and password, enable “remember my credentials”, then click OK.
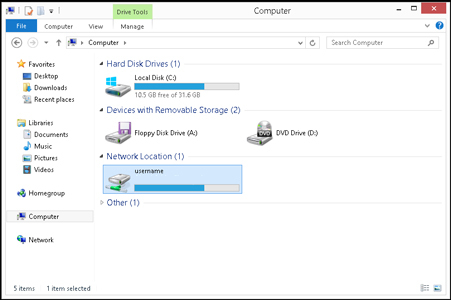
7. Verify that the process is complete by going back to “Computer”. The mapped letter drive should appear in the menu under the “Network Location” section.
Important Information About WebDAV
- Some database applications may not function on a Web-based network drive exactly like they do on a standard local area network drive. To be certain, ask your software vendor about how their software is supported accessing data files through a “WebDAV ” connection.